
Ovh Logo 
Rsync Logo 
Restic Logo 
BackBlaze Logo 
Ubuntu Logo 
Opensimulator Logo
Ubuntu Opensim Server Backup. An article describing one way to fully backup Opensimulator using Ubuntu and other opensource software. It follows on directly from Opensimulator Grid Backup & Restores; additionally, it is part of a more extensive Opensim Server Setup Using Ubuntu & Windows.
Data Stores – Ubuntu Opensim Server Backup
- Primary Backup – FTP folder on an OVH host.
- Secondary Backup – Backblaze Bucket
- Third Backup – Google Drive
- Fourth Backup – Local compuater
Summery Of Intent
- Mount the primary backup
- Create credential file for Backblaze
- Mount the Backblaze bucket
- Create credential file for Restic
- Mount Google Drive
- Create credential file for the SQL dump
- Initiate Restic repositories on the Primary and Secondary backup
- Dump Database Files to the ~/OpenSim/Data/MySql
- Syncronise /var/www to ~/OpenSim/Data/www
- Make the backup run automatically
Mounting the FTP Folder – Ubuntu Opensim Server Backup
First, create a mount point for the backup. This can be anywhere the user account can access. However, readers intending to use the sample scripts later should create
mkdir ~/ResticBackup
It is possible to mount any FTP folder using curl. The example below is generic, and the second is an actual example with substituted hypothetical values.
curlftpfs Login:password@server MountPoint
curlftpfs ip-155-4394-44.zz:djdHS573"37££[email protected] ~/ResticBackup
Further down the page, a Bash shell script that mounts all critical drives uses this. Details of finding the login information for OVH backup is in Buying Server Hosting For Opensimulator.
Mounting Google Drive – Ubuntu Opensim Server Backup
Mount Google drive using google-drive-ocamlfuse. There are full instructions available; since it is a server with no GUI, either use the instructions for Headerless Usage And Authorization or Service Accounts. Both methods require visiting Google Cloud Console to set up credentials. In addition, Google offers a helpful tutorial video for Creating and Using Service Accounts. Finally, take a look at the Team Drives instructions. If using the service account route, do not forget to use chmod 600 on the json credentials file(stops any other user on the system from accessing the file).
One area where their instructions could be more apparent is in the “label”. For example, Google-Drive-Ocamlfuse creates a new hidden folder in the users home directory called “.gdfuse.” The label then becomes the name of a subfolder inside the “.gdfuse” directory.
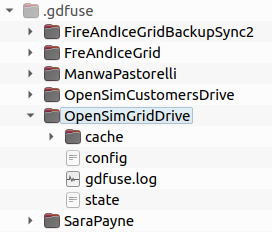
Config File
Inside the “config” file is a setting called team_drive_id=
The Id for the shared drives made in Email Calendar & File Sharing goes here.
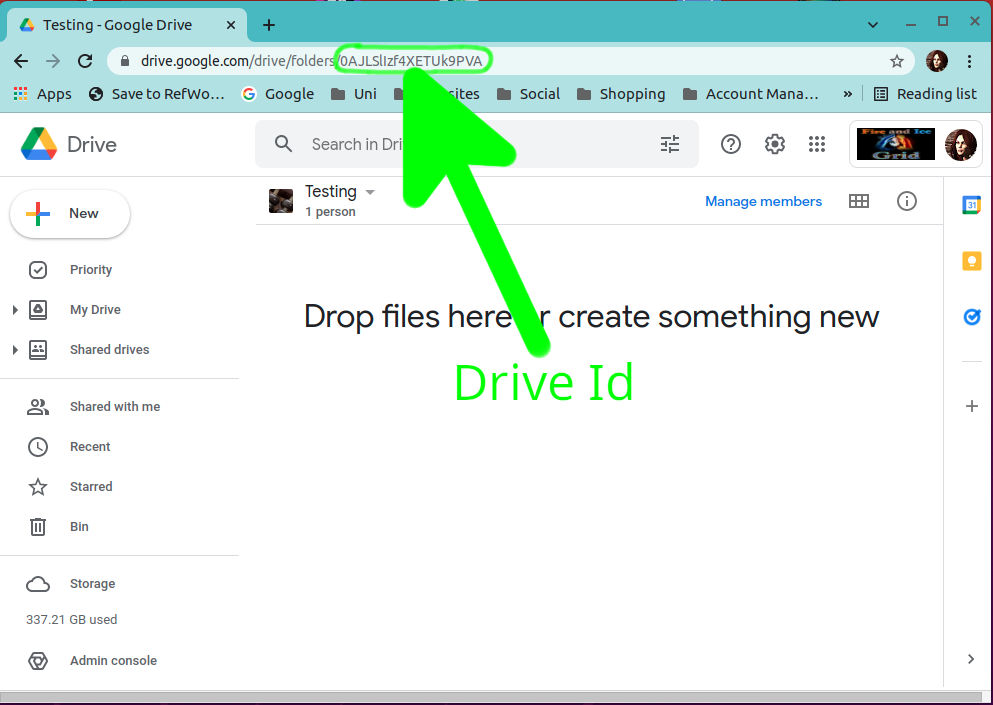
The team drives Id’s are found by opening the drive and copying the last part of the URL from a browser.
mkdir ~/GoogleDrives
mkdir ~/GoogleDrives/OpenSim
mkdir ~/GoogleDrives/OpenSim/Grid
From this point on, the drive can be mounted with
google-drive-ocamlfuse -label label MountPoint
google-drive-ocamlfuse -label OpenSimGridDrive ~/GoogleDrives/OpenSim/Grid/
A BASH shell script that mounts all drives uses this further down the page.
Create a credentials file for SQL dump
This will work for MySql and MariaDB; it will not work with PostgreSQL, added later.
This section refers back to Creating Databases For Opensimulator, as it requires the user name and password set for the databases.
Create the file with
nano ~/.mySqlLogin.cnf
[client]
user = Opensimulator
password = !*3Nhdgyle*$%
save and exit, then change the permissions so no other user on the system can access the file.
chmod 600 ~/.mySqlLogin.cnf
Create a credentials file for the Restic Repositories
Backblase uses an S3 style API. In Buying Remote Storage From Backblaze, it describes creating buckets and keys. The information from there is necessary for this step.
Both the Restic repositories will use the same credentials file. Create a new file in the users home folder called “.restic-env”. Using nano, this is done with
nano ~/.restic-env
Next, enter values like the example below. Like previous examples, the first is totally generic, and the second uses precise hypothetical values.
export RESTIC_PASSWORD="Password"
export B2_ACCOUNT_ID="Key Id"
export B2_ACCOUNT_KEY="Key"
export RESTIC_REPOSITORY="BucketName"
export RESTIC_PASSWORD="Mhd73"$£hs5"
export B2_ACCOUNT_ID="000SH29ssa3290000000050"
export B2_ACCOUNT_KEY="K000aCBEQja4+Qjaqwt7B5S4bdVlQog"
export RESTIC_REPOSITORY="b2:ServerFiles-192-168-1-254"Save and exit with
CTRL+O
CTRK+X
Use chmod to prevent any other user on the system from accessing the file
chmod 600 ~/.restic-env
Mount Backblaze And Initiate the Restic Repository
Firstly create a credentials file for the mount. It uses the same credentials as the restic-env but needs layout out differently.
Firstly create a new file in the user home folder called “.passwd-s3fs”. Each time Resitic is called, it will use this file. Using nano
nano .passwd-s3fs
Add the key and id and application key as shown below. The first is a generic example, and the second is an actual example with hypothetical substitute examples.
Key Id:Application Key000SH29ssa3290000000050:K000aCBEQja4+Qjaqwt7B5S4bdVlQogFinally, make sure no other users on the system can access this file by changing the permissions. It is possible to mount the bucket using this credentials file.
chmod 600 ~/.passwd-s3fs
Next, create the mount point its self, in this example, its
mkdir ~/BackBlazeDrive
Mounting the Backblaze Bucket
Mount the Backblaze repository with this command; again, there is a generic and precise example. Further down the page, this is used in a script.
s3fs BucketName PathToRepository -o passwd_file=Path/FileName -o url=EndPoint -o use_path_request_style
s3fs OarsMount ~/BackBlazeDrive -o passwd_file=$HOME/.passwd-s3fs -o url=https://s3.us-west-000.backblazeb2.com -o use_path_request_style
Initiate The Backblaze repository
cd ~/
source = ResticCredentialsFile
restic -r b2:BucketName init
source ~/.restic-env
restic -r b2:ServerFiles-192-168-1-254 init
Mount The FTP Drive from the OVH
This section uses the login details sent by OVH when the FTP backup is activated. Details are available in Buying Server Hosting For Opensimulator. Like other times there are two examples below, one generic and one precise. Also, like previous times later in the article, a script will run this.
curlftpfs Login:Password@Server
curlftpfs ns1025137.ip-192-168-1.eu:[email protected] ~/ResticBackup
Initiate the Restic Repository on the Mounted FTP folder
cd ~/
source = ResticCredentialsFile
restic -r b2:BucketName init
source ~/.restic-env
restic -r b2:~/ResticBackup init
Create a BASH shell script to mount folders and create a SystemD service to run them at startup.
Create a new shell script
nano ~/OpenSim/Scripts/MountDrives.sh
#!/bin/bash
s3fs ServerFiles-192-168-1-254 init $HOME/BackBlazeDrive -o passwd_file=$HOME/.passwd-s3fs -o url=https://s3.us-west-000.backblazeb2.com -o use_path_request_style

curlftpfs ns3085157.ip-145-239-4.eu:[email protected] $HOME/ResticBackup

google-drive-ocamlfuse -label OpenSimGridDrive $HOME/GoogleDrives/OpenSim/Grid
Repeat the process to create an unmount script
#!/bin/bash
fusermount -u $HOME/BackBlazeDrive
fusermount -u $HOME/GoogleDrives/OpenSim/Grid/
umount $HOME/ResticBackup
Next, make both of these files executable
chmod +x ~/OpenSim/Scripts/MountDrives.sh
chmod +x ~/OpenSim/Scripts/UnMountDrives.sh
Save and exit, then repeat a similar process to create a new systemD service file. However, this one must be completed with an editor using sudo privileges.
sudo nano /etc/systemd/system/MountDrives.service
  GNU nano 4.8                                                                   opensimulator.service
[Unit]
Description= Mounting Drives
Documentation=none
After=syslog.target network.target ufw.service mysql.service cron.service
[Service]
Type=simple
User=opensim
Group=opensim
WorkingDirectory=/home/opensim
ExecStart=/home/opensim/Scripts/MountDrives.sh
ExecStop=/home/opensim/Scripts/UnMountDrives.sh
RemainAfterExit=yes
KillMode=none
Environment=USER=opensim  HOME=/home/opensim
[Install]
WantedBy=multi-user.target
Save and exit, then enable the service.
sudo systemctl enable MountDrives.service
if the drives are not already mounted, start them with
sudo systemctl start MountDrives.service
Create a BASH shell script to perform a Backup All operation
Near the top of the script is an array of databases to backup. This will need changing on a per-server basis and the other values for the remote backup location, IP address etc.
Create a Cron task to perform the backup at regular intervals
#!/usr/bin/env bash
# shellcheck source=/home/sara/.restic-env

DATABASES=( Simulator00 Simulator01 Simulator02 )
IPADDRESS="192.168.1.254"
RemoteBackupLocation="b2:ServerFiles-192-168-1-254"
LocalBackupLocation="$HOME/ResticBackup"
SourceLocation="$HOME/OpenSim"

BackupMySql()
{
    cd $HOME/OpenSim/Data/MySql || return
    for DATABASE in "${DATABASES[@]}"
    do
        echo "Backing up MySql database: $DATABASE"
        mysqldump --defaults-extra-file=$HOME/.mySqlLogin.cnf --quick $DATABASE | bzip2 > $DATABASE.sql.bz2
    done
}

SyncWwwToGridFiles()
{
    echo "Syncronising www folders to grid files"
    rsync -azP --delete /var/www/ $HOME/OpenSim/Data/www/
}

SyncMapTiles()
{
    echo "syncing map tiles"
    rsync -azP --delete $HOME/OpenSim/Data/Maptiles/ $HOME/GoogleDrives/OpenSim/Grid/GridBackups/Maptiles/$IPADDRESS/
}

ResticBackupRemote()
{
    echo "Starting Restic Remote Backup"
    source $HOME/.restic-env
    echo "ensuring no locks stop this backup"
    restic -r $RemoteBackupLocation unlock
    echo "starting restic backup of grid files"
    restic -r $RemoteBackupLocation backup $SourceLocation
    echo "File backup complete, starting repository prune"
    restic -r $RemoteBackupLocation forget --keep-last 14 --prune
}

ResticBackupLocal()
{
    echo "Starting Local Remote Backup"
    echo "Starting Restic Remote Backup"
    source $HOME/.restic-env
    echo "ensuring no locks stop this backup"
    restic -r $LocalBackupLocation unlock
    echo "starting restic backup of grid files"
    restic -r $LocalBackupLocation backup $SourceLocation
    echo "File backup complete, starting repository prune"
    restic -r $LocalBackupLocation forget --keep-last 14 --prune
}

EnsureGdriveMounted()
{
    echo "checking Gdrives mounted"
    cd $HOME/GoogleDrives/OpenSim/Grid/OarAccess || RemountGdrive
}

RemountGdrive()
{
    echo "remounting Gdrives"
    cd $HOME/OpenSim/Scripts/
    ./UnMountGoogleDrives.sh
    ./MountGoogleDrives.sh
    return
}

EnsureFTPdriveMounted()
{
    echo "checking FTP drives mounted"
    cd $HOME/Restic/locks || RemountFtpDrive
}

RemountFtpDrive()
{
    echo "remounting FTP Drive"
}

SyncMySqlToBackupDrive()
{
    echo "Syncronising MySql Backup To Backup Drive"
    rsync -azP --delete $HOME/OpenSim/Data/MySql/ $HOME/GoogleDrives/OpenSim/Grid/MySqlBackup/$IPADDRESS/
}

SyncOarsToBackupDrive()
{
    echo "Syncronising Oars To Backup Drive"
    rsync -azP --delete $HOME/OpenSim/Data/Oars/ $HOME/GoogleDrives/OpenSim/Grid/OarAccess/$IPADDRESS/
}


BackupMySql
SyncWwwToGridFiles
SyncMapTiles
EnsureFTPdriveMounted
ResticBackupLocal
ResticBackupRemote
EnsureGdriveMounted
SyncMySqlToBackupDrive
SyncOarsToBackupDrive
The final task in this section is making a cron job to run the backup at regular intervals. If this is the first time running crontab, it will offer a choice of editors. Anyone unfamiliar with the options should probably choose nano.
crontab -e
add the following line to run the backup once a day at 06:00 (by the servers clock).
#Backup all every dat at 6am
0      06       *       *       *      /home/sara/BackupAll.sh
9 thoughts on “Ubuntu Opensim Server Backup”